Connect your detector to GeoDetectit
GeoDetectit works with detectors that provide an audio hit signal. Choose an existing detector configuration or use Sound Tuner to calibrate and create your own compatible profile.
1. Works with many brands
GeoDetectit is not locked to one detector brand. The app can work with different machines as long as there is an audio signal to read.
- Use a ready-made model profile if your detector already exists in Configure.
- If your model is missing, you can still use the app by calibrating your own profile.
- Signal levels and tone patterns can vary between different detectors.
- The app may therefore need adjustment depending on the model, audio source and connection path.
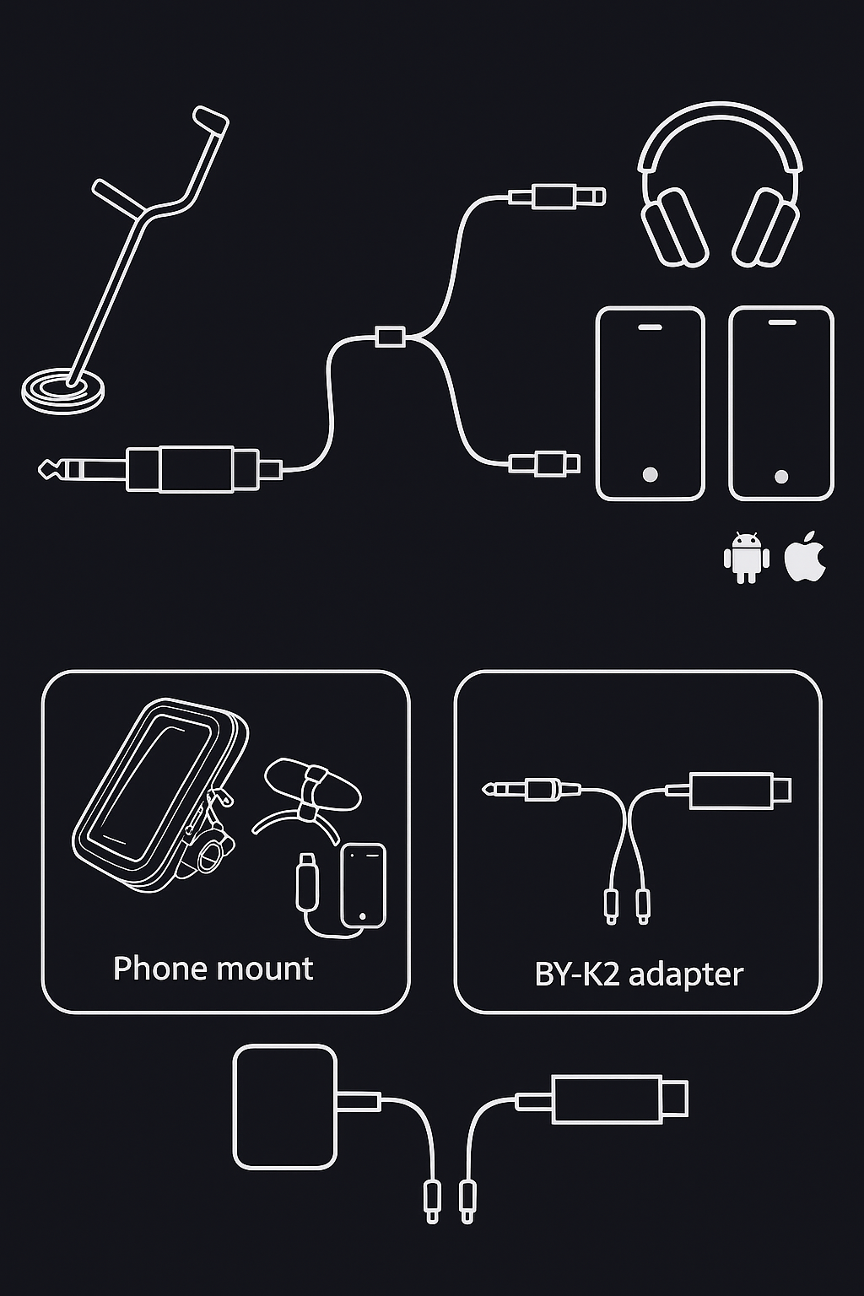
2. Common ways to connect
- Mic mode – also works when the app listens through the phone microphone.
- 3.5 mm TRS – most common on modern detectors.
- 6.3 mm TRS – larger jack on some models, used with a small 6.3 → 3.5 mm adapter.
- USB-C audio adapter – for example a BY-K2 type adapter, important that it supports external mic or line-in.
- Y-splitter – optional but useful if you want to hear the detector in headphones while the phone logs the audio.
- Bluetooth receiver – can be used when you get a stable audio signal into the phone.
3. If your detector already exists
The quickest path is to choose an existing profile.
- Open Configure in the app.
- Select the correct detector model.
- Use your Input source: Mic, Cable or Bluetooth.
- Test over a clear target.
- Verify that Sound Tuner or signal logging reacts in a stable way.
4. If your model is not listed yet
Use Sound Tuner to create your own compatible profile.
- Record a video or audio clip on your phone.
- Sweep over clear targets and observe which frequency ranges respond.
- Create slots or bands for different signal types.
- Save the profile with a clear name.
- Use the profile in the app as your custom model configuration.
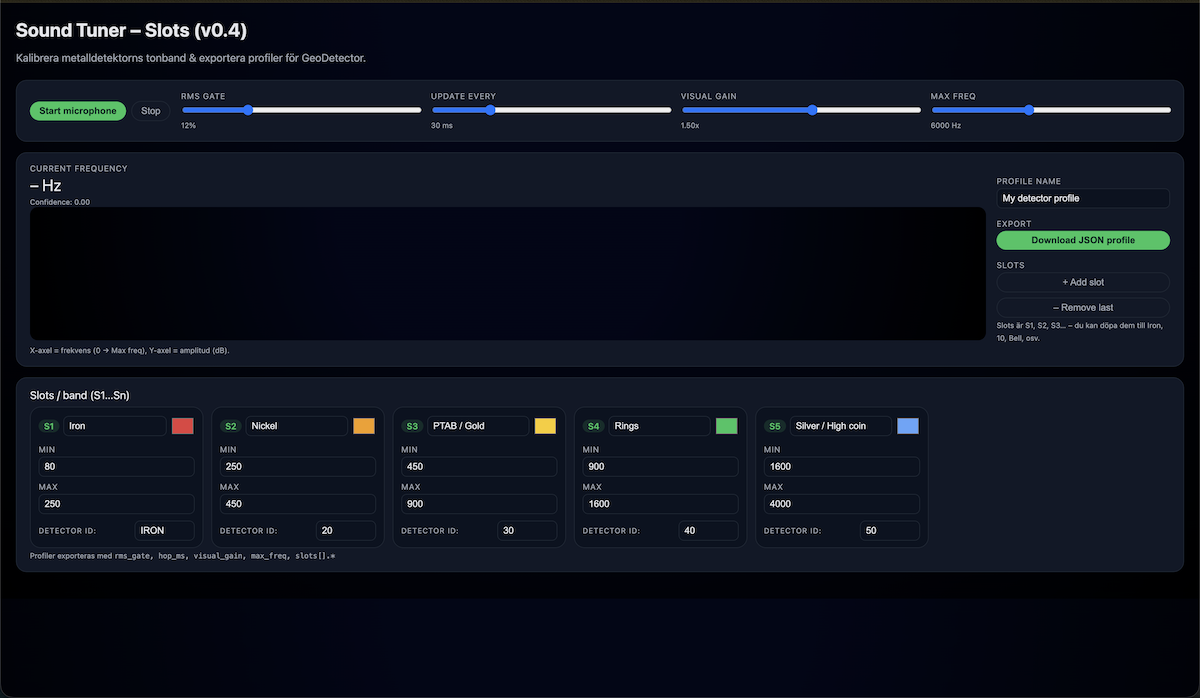
5. Sound Tuner
Sound Tuner is used to calibrate tone bands, see live reactions and export profiles. That makes it possible to support more models even when they are not built in from the start.
Phone mount
A weather-resistant mount on the shaft keeps the map visible and reduces cable strain while walking.
BY-K2 or similar
A simple TRS-to-USB-C adapter is often the easiest way to feed detector audio into the phone.
Short cable = fewer problems
Shorter cable runs and one loop of tape around the shaft reduce the chance of disconnects in the field.
6. Typical cable setup steps
- Connect the detector audio cable into the Y-splitter or directly into the USB adapter.
- Connect the adapter to the phone.
- Connect headphones to the second branch if you use a splitter.
- Open Configure and select Input source: Cable.
- Sweep over a clear target and verify that Sound Tuner reacts.
7. When you need more calibration
- If signals are too weak or too strong.
- If different targets end up in the wrong band.
- If your detector uses a tone profile that differs from the built-in defaults.
- If you switch between mic, cable and Bluetooth and get different levels.
FAQ
Does it work with a normal phone microphone?
Yes — it works with detectors that provide an audio signal. Sound levels may vary between models and brands. For best results, use a wired headset and place the microphone close to the detector’s speaker.
Does it work with all brands?
It works with detectors that provide a usable audio signal. Exact calibration may differ between models.
Do I have to use cable?
No. You can use mic, cable or Bluetooth depending on your setup and how you feed the audio into the phone.
What does Sound Tuner do?
Sound Tuner helps you see frequency reactions, adjust bands and create your own profile if your model is not already available.
Can I save my own profile?
Yes. That is the whole point of a model-independent setup: you can calibrate and save your own compatible configuration.
Ready to connect?
Open the app, choose an existing profile or build your own with Sound Tuner.